This article concerns fellow programmers that use libGDX. We hope you will find it useful.
We are using libgdx to develop our upcomming game. To manage the project configuration and building, we had been using the gdx-setup-ui.jar at the beginning and then we created a gradle setup using the jvoegele/gradle-android-plugin. Unfortunately this plug-in was discontinued when Google released its own tool-chain based on Gradle. So after a couple of updates of the Android SDK our setup stopped working and we migrated our setup to use the Google gradle plug-in. This proved not very straightforward and so we decided to write this how-to.
So we will show you the configuration that will let you use gradle to:
- Automatically download library dependencies for your projects
- build your project
- create project files so you can import them to eclipse, provided that you already have your project tree(very useful if you use a source control software like git or hg to share code in a team)
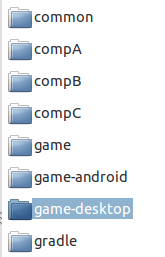 |
Our example is a multi-project setup consisting of the following subprojects.
Our project tree starts with project ‘common’. We also have projects ‘compA’,’compB’ and ‘compC’ that depend on ‘common’. Then ‘game’ depends on all ‘compA’,’compB’ and ‘compC’. We treat the ‘game’ project as our ‘core’ project.
We now have the two projects ‘game-android’ and ‘game-desktop’ that depend on ‘game’ to complete the project tree.
The ‘game-android’ is for working on the android version and ‘game-desktop’ is a project using the cross-platform capability of libgdx that allows to test, run and rapidly cycle our development on our Desktop workstations.
|
For gradle to create all these projects we will create three files
- the ‘settings.gradle’ file (on the project tree root directory)
- the ‘build.gradle’ file (on the project tree root directory also) and
- the ‘build.gradle’ file on the android project directory
Note: you can use ‘build.gradle‘ files on all your projects’ directories. For simplicity we chose to include everything on our central ‘build.gradle’ except the android project which needs more lines of configuration.
Source build files from libgdx project
To create this setup we used gradle code found in the following two files from the libgdx project:
Special thanks to the libgdx team for providing these files
root settings.gradle
Starting with this file here, we will tell gradle which sub-projects comprise our multi-project
include ':common'
include ':compA'
include ':compB'
include ':compC'
include ':game'
include ':game-desktop'
include ':game-android'
build.gradle
Here we will include the allprojects section where we will declare the common properties of all our projects. We add the sonatype repository so that gradle can download the gdx libraries.
Allprojects {
  apply plugin: 'eclipse' //because we need gradle to make eclipse projects
  repositories{
    mavenCentral()
    maven { url "https://oss.sonatype.org/content/repositories/snapshots/" } // gdx libraries
  }
}
First we will work on the ‘common’ project on which all of the projects depend. We are going to include the gdx library dependencies and we also need to change the default java source and binary version target to 1.6 since Dalvik(android jvm) cannot run 1.7 compiled classes. We need to change it in all our projects that contain java files, because 1.7 compiled classes will run fine on desktop, but will break on the android project.
project (":common"){
  apply plugin: 'java'

  project.targetCompatibility= '1.6'
  project.sourceCompatibility = "1.6"

  dependencies {
    compile "com.badlogicgames.gdx:gdx:0.9.9"
    compile files ('libs/tweenengine-6.3.3.jar')
  }

  eclipse {
    project {
      linkedResource name: 'src/main/resources/common', type: '2', locationUri: 'PARENT-1-PROJECT_LOC/game-android/assets/common'
    }
  }
}
A problem we faced, in order for for the android project to work, was that we needed to put our resources(images,sounds etc) in the assets folder of the android project. This though made these resources unavailable for the other projects. The solution was to add the following to the eclipse task which created a virtual link in the resources folder of each project.
linkedResource name: 'src/main/resources/common', type: '2', locationUri: 'PARENT-1-PROJECT_LOC/game-android/assets/common'
For the compA,compB,compC projects apart from the mentioned above 1.6 version setting and the linkedResources eclipse config we included the dependency on the ‘common’ using the following:
project (":compA"){
  apply plugin: 'java'

  project.targetCompatibility = '1.6'
  project.sourceCompatibility = "1.6"

  dependencies {
    compile project (":common")
  }

  eclipse {
    project {
      linkedResource name: 'src/main/resources/compA', type: '2', locationUri: 'PARENT-1-PROJECT_LOC/game-android/assets/compA'
    }
  }
}

project (":compB"){
  apply plugin: 'java'

  project.targetCompatibility= '1.6'
  project.sourceCompatibility = "1.6"

  dependencies {
    compile project (":common")
  }

  eclipse {
    project {
      linkedResource name: 'src/main/resources/compB', type: '2', locationUri: 'PARENT-1-PROJECT_LOC/game-android/assets/compB'
    }
  }
}

project (":compC"){
  apply plugin: 'java'

  project.targetCompatibility= '1.6'
  project.sourceCompatibility = "1.6"

  dependencies {
    compile project (":common")
  }

  eclipse {
    project {
      linkedResource name: 'src/main/resources/compC', type: '2', locationUri: 'PARENT-1-PROJECT_LOC/game-android/assets/compC'
    }
  }
}
Next we have the ‘game’ project that is our “core” project that includes all the others and where the actual game code is located and joined. Here we again need the 1.6 version constraint and a linked resource. We also include the dependencies on the components.
project (":game") {
  apply plugin: 'java'

  project.targetCompatibility= '1.6'
  project.sourceCompatibility = "1.6"

  dependencies {
    compile project (":compA")
    compile project (":compB")
    compile project (":compC")
  }

  eclipse {
    project {
      linkedResource name: 'src/main/resources/main', type: '2', locationUri: 'PARENT-1-PROJECT_LOC/game-android/assets/main'
    }
  }
}
Next we have the ‘game-desktop’ project which is actually only a stub that creates one LwjglApplication on its MainClass. It also includes all the runtime configuration required for the application to run.
project (":game-desktop") {
  apply plugin: 'java'
  apply plugin:'application'

  mainClassName = "mobi.duckseason.GameDesktop"

  project.targetCompatibility= '1.6'
  project.sourceCompatibility = "1.6"

  dependencies {
    compile "com.badlogicgames.gdx:gdx-backend-lwjgl:0.9.9"
    compile "com.badlogicgames.gdx:gdx-platform:0.9.9:natives-desktop"
    //do not forget to include natives like this for all gdx extensions you might use (eg. Gdx-freetype)

    compile project(":game")
  }
}
We also seem to need to include this section or otherwise will we have trouble importing our projects in Eclipse.
tasks.eclipse.doLast {
  delete ".project" //deletes the generated .project from project tree root directory
}
android build.gradle
buildscript {
  repositories {
    mavenCentral()
  }

  dependencies {
    classpath 'com.android.tools.build:gradle:0.7.3+'
  }
}
Right after that we are going to configure our basic project properties, plugin, build version information and directory information.
apply plugin: 'android'
android {
  compileSdkVersion 17
  buildToolsVersion "19.0.1"

  sourceSets {
    main {
      manifest.srcFile 'AndroidManifest.xml'
      java.srcDirs = ['src']
      resources.srcDirs = ['src']
      aidl.srcDirs = ['src']
      renderscript.srcDirs = ['src']
      res.srcDirs = ['res']
      assets.srcDirs = ['assets']
    }
    instrumentTest.setRoot('tests')
  }
}
Next we are going to define the dependencies that are required for android to work. We also have to define a new ‘gradle configuration’ for the native libraries. We will discuss why this is needed later.
configurations { natives }
dependencies {
  compile project(":game")
  compile "com.badlogicgames.gdx:gdx-backend-android:0.9.9"

  //We also add here native libraries just as we did on the desktop project but in a completely different way. See how we handle the 'natives' configuration later
  natives "com.badlogicgames.gdx:gdx-platform:0.9.9:natives-armeabi"
  natives "com.badlogicgames.gdx:gdx-platform:0.9.9:natives-armeabi-v7a"
  natives "com.badlogicgames.gdx:gdx-freetype-platform:0.9.9:natives-armeabi"
  natives "com.badlogicgames.gdx:gdx-freetype-platform:0.9.9:natives-armeabi-v7a"
}
Now we will add this section that will provide the eclipse plugin the information it is recognized as an android project within the IDE. Please note that while the eclipse plugin creates the project it will not be yet usable and recognized unless you perform Android Tools → Fix Project Properties in the context menu of the project in the eclipse navigator.
eclipse {
    // need to specify Java source sets explicitely, SpringSource Gradle Eclipse plugin
    // ignores any nodes added in classpath.file.withXml
  sourceSets {
    main {
      java.srcDirs "src", 'gen'
    }
  }

  jdt {
    sourceCompatibility = 1.6
    targetCompatibility = 1.6
  }

  classpath {
    plusConfigurations += project.configurations.compile
    containers 'com.android.ide.eclipse.adt.ANDROID_FRAMEWORK', 'com.android.ide.eclipse.adt.LIBRARIES'
  }

  project {
    name = "evolution-main-game-android"
    natures 'com.android.ide.eclipse.adt.AndroidNature'
    buildCommands.clear();
    buildCommand "com.android.ide.eclipse.adt.ResourceManagerBuilder"
    buildCommand "com.android.ide.eclipse.adt.PreCompilerBuilder"
    buildCommand "org.eclipse.jdt.core.javabuilder"
    buildCommand "com.android.ide.eclipse.adt.ApkBuilder"
  }
}
Now we will use the ‘natives’ configuration we declared previously on the dependencies and instruct gradle to copy the native libraries in our output dir so that the android SDK will package them in the application apk file.
task copyAndroidNatives() {
  file("libs/armeabi/").mkdirs();
  file("libs/armeabi-v7a/").mkdirs();
  file("libs/x86/").mkdirs();

  configurations.natives.files.each { jar ->
    def outputDir = null
    if(jar.name.endsWith("natives-armeabi-v7a.jar")) outputDir = file("libs/armeabi-v7a")
    if(jar.name.endsWith("natives-armeabi.jar")) outputDir = file("libs/armeabi")
    if(jar.name.endsWith("natives-x86.jar")) outputDir = file("libs/x86")
    if(outputDir != null) {
      copy {
        from zipTree(jar)
        into outputDir
        include "*.so"
      }
    }
  }
}
Running gradle and producing the eclipse files
We have chosen to include the Gradle wrapper with our project files so that we can use gradle without the need for it to be pre-installed on the systems we are going to work on the project. You can find more information on installing and using it here:
http://www.gradle.org/docs/current/userguide/gradle_wrapper.html
So, first we need to setup the location of the android sdk for the plugin to work. I work on Linux so I chose to use an Environment Variable which I setup in my ~/.bashrc. You can just ‘export’ your variable for now with the following command
gaganis@lubuntu:~/workspace-kepler/exelixis$ export ANDROID_HOME=/home/gaganis/programming/adt-bundle-linux-x86-20131030/sdk/
sdk.dir=%your%path%to%android%sdk%
After setting the above(any way you choose), you can run gradle to create the eclipse files. Running it for the first time, it will also download the gradle version we have selected and all our required dependencies for the project so it might take a while.
gaganis@lubuntu:~/workspace-kepler/exelixis$ ./gradlew cleanEclipse eclipse
Next we need to import the projects in eclipse and fix the project properties for the android-project. I have tried to take a screenshot of the context menu but my OS does not seem to be able to screenshot while I have the context menu open! Sorry. You need to select the project from the navigator/package explores Right-Click on it and select Android Tools → Fix Project Properties.
One thought on “How-to setup gradle for existing libgdx multi-project using the Google android plug-in.”
Leave a Reply
You must be logged in to post a comment.
Nice example. Trying it on windows 8.